What follows is my attempt to replace PHP with Javascript in WordPress development.
Okay! You’ve bought into my crazy experiment, or at least you’re intrigued enough to stick around. Thanks! This article will discuss the basic setup of the project: setting up a Node server with Express, configuring Webpack with a bunch of goodies, and how the GraphQL server works.

Don’t be an Alice – be a Jillian.
Webpack Configuration
We’ll be using webpack to take advantage of things like Hot Module Replacement, React CSS Modules, and some other cool things that will basically make the development of this project a lot easier.
This isn’t a webpack tutorial, but there are some settings here that were needed to work properly with GraphQL and Relay.
Here is the entire webpack.config.js file, in all of it’s glory.
Things to note
The devServer object’s host key points to 127.0.0.1 (localhost) using port 3000 ; however, note that we are proxying the target “/graphql” to point to port 8080. This will be explained later, but it allows us to make GraphQL queries to the the /graphql endpoint from our application.
We’re using Babel to transpile any javascript file that isn’t inside of the node_modules folder. Familiarize yourself with the .babelrc file for this project, as it contains all the presets and plugins needed.
I’m using SASS for styling, and using the ExtractTextPlugin along with sass-loader and style-loader to generate class names. If this doesn’t make a lot of sense, I plan on writing a whole article about its usage in this series, so don’t worry. In the meantime, read about React CSS Modules. It’s life changing.
Last thing to note, I’m using BrowserSync on port 3000 to proxy port 3100, and running the Express server of port 3100. This is necessary because Hot Reloading doesn’t work when webpack rebuilds CSS files?—?so I’m using BrowserSync to inject those CSS changes, eliminating the need to refresh the page to see styling changes.
Server Configuration
As noted above, I’ll be using Express to run the server. I’ll actually be using two separate express servers, one for our main application, and another for the GraphQL Server. The setup is pretty easy.
Here’s the server.js file:
Things to note
Alright! Express! I’ll start off by pointing out that I’m importing my graphQL Schema, which is necessary to include for our GraphQL Server. Don’t worry about what this looks like, yet.
As I noted, I’m creating two express servers, one for the application itself, and one for GraphQL. The main application server setup itself is pretty standard boilerplate for using express with webpack-dev-server. The only thing to note is that, again, we’re proxying GraphQL on port 8080.
So, let’s discuss the GraphQL server.
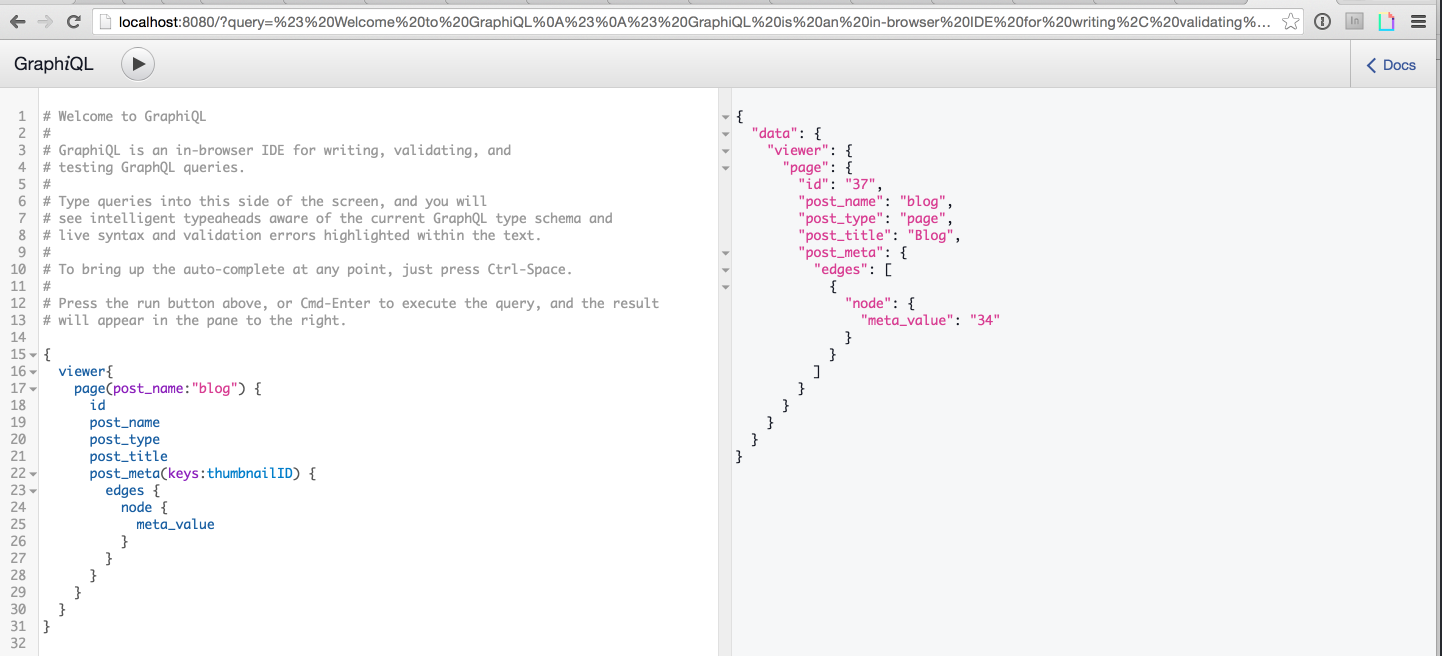
The GraphQL server is listening on port 8080 (which our main application is proxying for the /graphql endpoint!). The server is using a function called graphqlHTTP, which is given to us from the very lovely express-graphql middleware. It takes just a few arguments, the most important of which is schema, which is required. The Schema must be a GraphQLSchema instance. The pretty argument pretty-prints JSON output, which is nice. Lastly, the graphiql argument, when true, will provide an instance of GraphiQL in the browser at whichever port your GraphQL server is running on. GraphiQL is an in-browser IDE for testing and debugging GraphQL queries. Here is what it looks like in this project.

Note that the browser is pointed to localhost:8080. The query string in the URL is generated for us. Also note?—?LOOK! This is real data that was retrieved from a WordPress MYSQL database. WOW!
GraphiQL is an invaluable tool for testing and debugging your queries. INVALUABLE.

Us, talking about GraphQL in 2 years, probably.
Running The Server
I’m a big fan of using NPM scripts to do everything?—?this project is no different. In our package.json file you’ll see several. The most important one, during development at least, is the run script. As you can see, it sets the NODE_ENV to development, and then runs the server from the server.js file. Easy-peezy.
That’s it! That’s all I’ve got for you today! In the next article, I discuss setting up a database file by building models using Sequelize, and how they are imported into the GraphQL Schema.
View: Part 3—The Schema.
